はじめに
Compute Shader を理解したいと思い、簡単に実装できそうな 平均化フィルタ をCompute Shaderで実装してみました。
環境
Unity 2020.2.0f1
Universal RP 10.2.2
目次
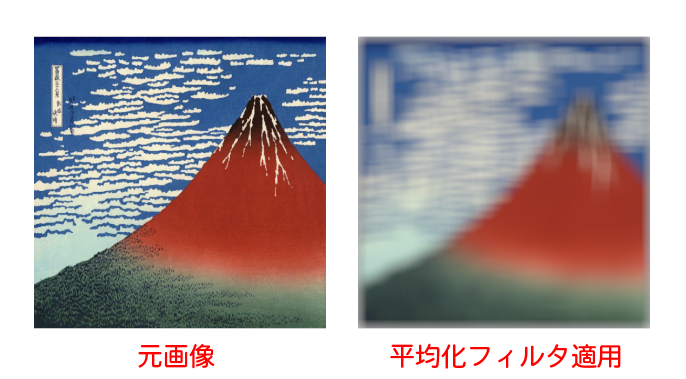
平均化フィルタの効果
平均化フィルタを適用することで、画像がぼやけるようなエフェクトをかけることができます。
平均化フィルタの仕組み
画像のあるピクセルに注目し、その値を周辺のピクセルの平均値に置き換えるような処理を考えます。
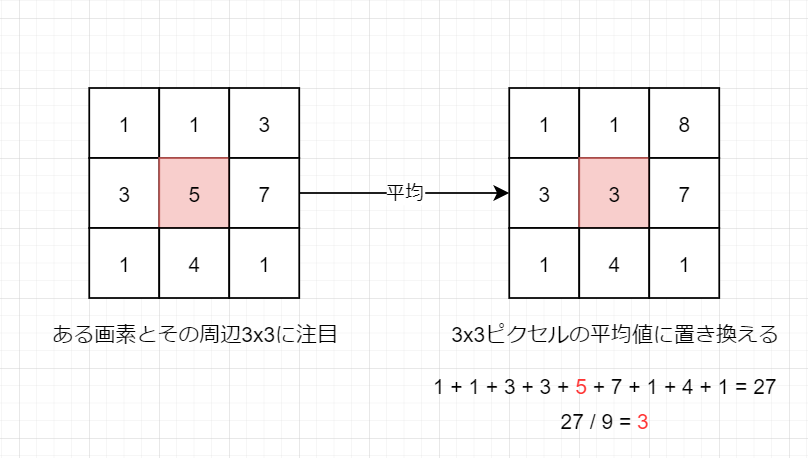
この平均化処理を画像のすべてのピクセルに対して適用することで、画像がぼやけたような効果が得られます。
先ほどの例ではフィルタサイズ3x3で説明していましたが、以下の例では64x64という大きいサイズのフィルタを適用しています。
平均化フィルタの実装 (Compute Shader)
ComputeShaderによる平均化フィルタの実装例を以下に示します。
ここでは[numthreads(1,1,1)] と書いてしまっていますが、これはあまり良いコードではありません(理由は後述します)
#pragma kernel CSMain

int FilterSize; // フィルタサイズ
Texture2D<float4> Texture; // 入力画像
RWTexture2D<float4> RenderTexture; // 平均化フィルタを書けた画像の書き込み先

[numthreads(1,1,1)]
void CSMain (uint3 id : SV_DispatchThreadID)
{
    // 周辺ピクセルを合計する
    float4 total = 0.0;
    for (int y = -FilterSize/2; y <= FilterSize/2; y++) {
        for (int x = -FilterSize/2; x <= FilterSize/2; x++) {
            total += Texture[id.xy + int2(x, y)]; // sRGBテクスチャから取得する色には逆ガンマ補正がかかる(リニア色空間)
        }
    }
    // フィルタの大きさで割る (平均値をとる)
    total = total / FilterSize / FilterSize;

    // 書き込み先のRenderTextureはsRGBなので、ガンマ補正をかける (LinearカラーをsRGBカラーにする)
    total = pow(total, 1.0/2.2);

    // RenderTexture へ書き込み
    RenderTexture[id.xy] = total;
}
ComputeShader を実行するC#スクリプト
using UnityEngine;
using UnityEngine.UI;

public class AverageFilter : MonoBehaviour
{
    [SerializeField] private ComputeShader shader; // 実行するComputeShader
    [SerializeField] private Texture _texture; // 入力画像
    [SerializeField] private RawImage targetImage; // RenderTextureを割り当てる対象のRawImage
    [SerializeField] private int filterSize = 64; // フィルタサイズ
    private RenderTexture _renderTexture;

    private void Start()
    {
        // RenderTexture作成
        _renderTexture = new RenderTexture(_texture.width, _texture.height, 0);
        _renderTexture.enableRandomWrite = true;
        _renderTexture.Create();

        // 実行したいカーネル(関数のようなもの)
        int kernel = shader.FindKernel("CSMain");

        // ComputeShaderへデータを渡す
        shader.SetInt("FilterSize", filterSize); // フィルタサイズ
        shader.SetTexture(kernel, "Texture", _texture); // 元となるテクスチャ
        shader.SetTexture(kernel, "RenderTexture", _renderTexture); // 書き込み先のテクスチャ

        // テクスチャの画素数ぶんのスレッドを回す
        shader.Dispatch(kernel, _texture.width, _texture.height, 1);

        targetImage.texture = _renderTexture;
    }
}
結果
元のテクスチャ(左側)と、ComputeShaderでぼかした結果のレンダーテクスチャを割り当てたものを並べてみました。
両方ともRawImageにテクスチャを割り当てて表示しています。
スレッドグループ数は1を指定しないほうが良い
先ほどはスレッドグループ数 [numthreads(1,1,1)] を指定していました。
下記リンクによれば、スレッドグループ数には32や64といった数を指定した方が良いようです。
www.reddit.com
スレッドグループ数に1を指定した場合でも、nVidiaのGPUでは32スレッドのグループが確保されてしまい、結果としてGPUの3%ぶんしか活用されないようです。
E.G. nVidia's hardware is organized in groups of 32 threads, any threadgroups of less than 32 threads is still using 32 hardware threads. The extra hardware threads are just prevented from writing to memory so they have no effect. A 1080ti has about 28 compute clusters, each with 128 threads. If you do (1,1,1) you can run at most 112 threads (28CUs * 4 simd's per CU) out of the 3584 (28*128) potential threads that the gpu can run. Achieving about 3% gpu utilization.
修正ComputeShader
今回は1024x1024の画像に対して平均化フィルタを適用しているため、[numthreads(32,32,1)] を指定してみます。 (合計 32 * 32 * 1 = 1024スレッドが実行されます)
#pragma kernel CSMain

int FilterSize; // フィルタサイズ
Texture2D<float4> Texture; // 入力画像
RWTexture2D<float4> RenderTexture; // 平均化フィルタを書けた画像の書き込み先

[numthreads(32,32,1)]
void CSMain (uint3 id : SV_DispatchThreadID)
{
    // 周辺ピクセルを合計する
    float4 total = 0.0;
    for (int y = -FilterSize/2; y <= FilterSize/2; y++) {
        for (int x = -FilterSize/2; x <= FilterSize/2; x++) {
            total += Texture[id.xy + int2(x, y)];
        }
    }
    // フィルタの大きさで割る (平均値をとる)
    total = total / FilterSize / FilterSize;

    // RenderTextureはsRGBなので、リニアカラーにガンマ補正をかける
    total = pow(total, 1.0/2.2);

    // RenderTexture へ書き込み
    RenderTexture[id.xy] = total;
}
修正ComputeShaderを実行するC#スクリプト
Threadグループ数(numthread)を考慮して、Threadグループサイズを計算します。
今回はテクスチャの画素数ぶんのスレッドを回すため、Threadグループサイズは以下の計算で求まります。
using UnityEngine;
using UnityEngine.UI;

public class AverageFilter : MonoBehaviour
{
    [SerializeField] private ComputeShader shader; // 実行するComputeShader
    [SerializeField] private Texture _texture; // 入力画像
    [SerializeField] private RawImage targetImage; // RenderTextureを割り当てる対象のRawImage
    [SerializeField] private int filterSize = 64; // フィルタサイズ
    private RenderTexture _renderTexture;

    private void Start()
    {
        // RenderTexture作成
        _renderTexture = new RenderTexture(_texture.width, _texture.height, 0);
        _renderTexture.enableRandomWrite = true;
        _renderTexture.Create();

        // 実行したいカーネル(関数のようなもの)
        int kernel = shader.FindKernel("CSMain");

        // ComputeShaderへデータを渡す
        shader.SetInt("FilterSize", filterSize); // フィルタサイズ
        shader.SetTexture(kernel, "Texture", _texture); // 元となるテクスチャ
        shader.SetTexture(kernel, "RenderTexture", _renderTexture); // 書き込み先のテクスチャ

        // スレッドグループサイズの取得
        uint sizeX, sizeY, sizeZ;
        shader.GetKernelThreadGroupSizes(kernel, out sizeX, out sizeY, out sizeZ);

        // スレッドグループサイズ * スレッドグループ数 = テクスチャ画素数 となるようなスレッドグループ数を指定して実行
        shader.Dispatch(kernel,
            _texture.width / (int)sizeX,
            _texture.height / (int)sizeY, 1 / (int)sizeZ);

        targetImage.texture = _renderTexture;
    }
}
結果
左側に元画像、右側に平均化フィルタを適用した画像を並べてみました。

